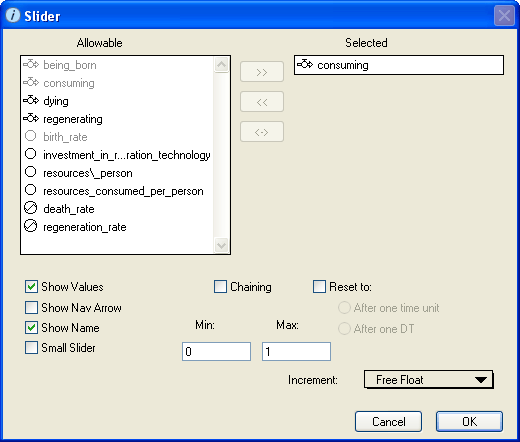
Use the Slider dialog box to view and edit the properties of the selected slider.
To open the Slider dialog box, double-click the slider icon on the Interface layer, or select the slider and then choose Open Selection from the Interface menu (or right-click the slider icon and then choose Open from the menu that appears).

Displays a list of all entities that can be associated with the slider. Use this list to select the entity that you want to associate with the slider. If you select the Chaining check box, you can select multiple entities to assign to the set of chained sliders.
Displays the name of the entity you selected from the "Allowable" list. If you are defining a chained slider, the "Selected" list displays a list of all selected entities for the chained slider.
Select this check box to display the current value for the associated entities (and minimum and maximum values, if applicable) on the sliders. If you do not select this check box, no numeric values appear on the sliders.
Select this check box to display a navigation ( ) button on the sliders.
When you click the navigation ( ) button, the software displays the Model layer and highlights the icon for the associated entity.
Select this check box to display the name of the entity associated with the slider above the slider in the diagram.
For chained sliders, the entity names appear to the right of the sliders.
If you do not select this check box, no name appears for the slider.
Select this check box to use a smaller-sized slider.
Note: This check box is not available if the Chaining check box is selected]
Select this check box to have a slider that links from two to ten entities. With a chained slider, the entities are linked such that their summed total will equal 100..
To use the chaining feature, select two to ten entities from the "Allowable" list and add them to the "Selected" list.
Select this check box to assign unallocated values to another model entity. When you select this check box, another box appears where you can specify the entity name. Type the entity name in the box (or click its name in the "Allowable" list).
Select this check box to reset the selected entity to the specified value either after one DT or after one time unit.
This option is useful for preventing users of your models from inadvertently buying 10 houses or hiring 10 people a month for two years when they really only wanted to execute each of these actions once.
Notes: The value you specify here must be within the min/max value range specified for the entity.
The Reset to check box is not available for chained sliders.
Use these boxes to specify the minimum and maximum values that can be selected with the slider. The minimum and maximum values appear on the slider icon if the Show Values check box is selected.
By default, the minimum value is one less than the entity's current value and the maximum value is one more than the entity's current value.
Select the increments between the values that can be selected with the slider. Selecting tenths (.1) or hundredths (.01) allows users to type in values in tenths or hundredths.